Have you ever dealt with your rifle scope and failed to fix it and then fix it to the local gun shop? We know fixing up a rifle scope is intimidating for every beginner.
But, shooting is your passion, then don’t waste more time and educate on some simple but effective tips. Hopefully, they all work if you follow the instructions.
In this article, we will clarify how to adjust a rifle scope and some basic tips and tricks to conduct it.
Table of Contents
What Does Adjusting A Rifle Scope Mean?
Adjusting your rifle scope means you know a few certain things very well, so at the end of your work, you can maximize your eye relief and get easy targeting.
The process is not that easy, especially when you don’t know some action that leads to finishing the setup process.
But once you come to know the three techniques consecutively, then it would be easy to operate your rifle scope easily, and they are:
- Fix the right eye relief
- Ensure the scope is level
- Fine-tuning the eyepiece focus
Also, read our review on the best scopes under $100.
How Do Scope Adjustments Work?
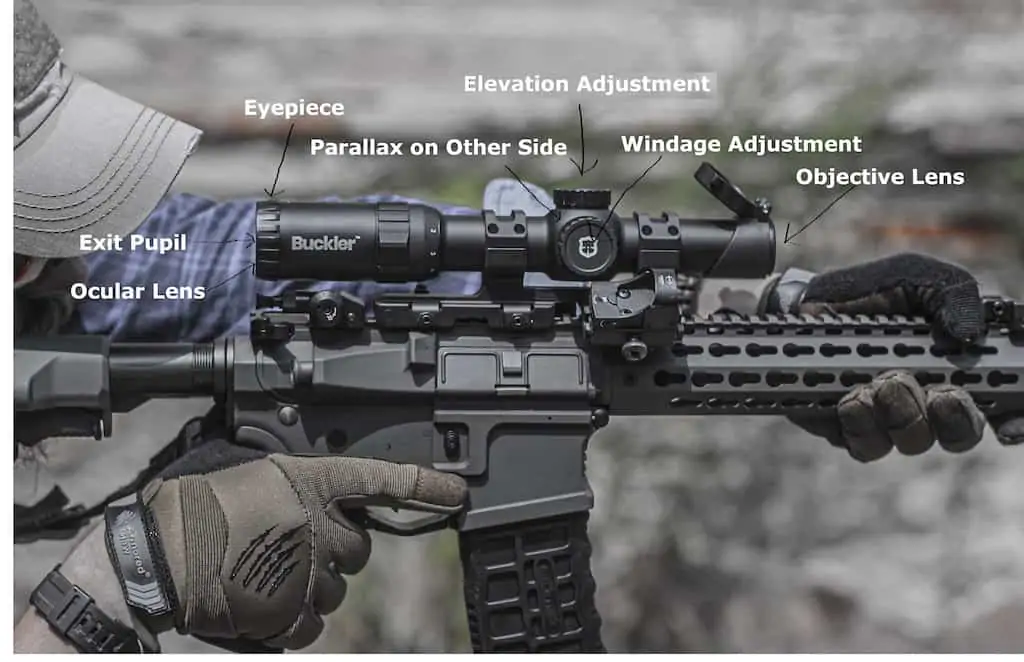
 Scope adjustment is an easy task as long as you are skilled in setting the three combinations perfectly, and they are Elevation, Windage, and finally Parallax.
To do these three sorts of things, you just need to balance it in the right manner; however, it is not easy to the newbie, but for a fast learner, it takes a few hours.
Afterward, your task would be accomplished the two basic turrets on your scope, and they are called elevation and windage, which we will briefly describe in this article.
After adjusting it, you will find the reticle goes up and down, left and right on the aim point.
Let’s talk about Windage and Elevation adjustment briefly below:
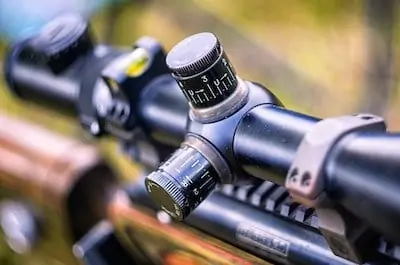
Windage Adjustment
You will find the windage adjustment on the right side of your rifle scope. To adjust it, first, you need to zoom in to the maximum level and then focus the image on seeing whether it is crisp and clear or not.
Now, when you move on to the 4x magnification, then take your first shot targeting in the middle of the vertical line. After firing several shots, now you can assume how far off your shots are reaching.
Hence, it would be possible to determine the average divergence of the shots to the left and right. Based on that divergence, you can make the correction of your windage adjustment.
Now again, shoot three times and find out the average divergence once again and do this until you fix it.
Elevation Adjustment
The elevation adjustment is on the top of the rifle scope, and the adjustment process is almost the same as the windage adjustment.
To accomplish this step, you will need a sheet of A4 paper then draw a horizontal line. That would be like fifteen centimeters in total. Keep in mind that this page would be attached to the target plate too.
After a while, you will fire 3 shots on that drawn line. It is because of finding the average divergence just like you did with the windage adjustment.
Now you will find the divergence up or down and ensure the adjustment, and you may need a few clicks. Keep targeting and make a correction of the divergence.
Parallax
The parallax deviation is involved with the eye movement when you deal with the eyepiece of the rifle scope. In these circumstances, you need to adjust the reticle, which sometimes slightly moves away from the target.
To solve it, you will need to look through the eyepiece; however, it is not that easy. It is really tough for a beginner to sit straight in front of a rifle scope.
Why Is Scope Adjusting Necessary?
It is important to see the image just right in front of your reticle, after setting up the magnification level to that point. The problem will encounter when you can’t do so. It seems you will be completely out of focus, which is a sheer bad thing with your rifle.
As you know, sniping is one of the growing sports and a lot of people have the wrong idea about it. To make it clear to you as a passionate gun owner, you should come to know all the hacks about the scope adjustment.
Skill is an important factor, but when you are not getting the perfect target on your aim, then obviously, your skill will be lowering down.
Every professional shooter must know how to adjust a rifle scope. Besides, while you are on the game, you may take advantage of those who still don’t cope with that. It will benefit you to increase accuracy when you are in the competition.
We will cover every ins and out to set up a perfect rifle scope, so make sure you come to know all of them.
How to Adjust a Rifle Scope – Step by Step Guide
You must have heard of many instructions and maybe read a few articles. However, still, you need to know some surefire guidelines, so, at the end of this article, you will be going to make this.
Besides, we are showing you the step-by-step process to set up your rifle scope, so make sure you don’t miss out on any of them.
Now let’s bring you to the full guideline of adjusting a rifle scope below.
1. Know the Basics
 A rifle scope is a device that is attached to the rifle that helps to adjust the line to the aim and show you the pointer that is called a reticle pointer. Following the reticle pointer, you will shoot the target.
Dealing with the rifle scope would be a bit easy for you while you will be educated on basic bullet trajectory. So you should know how the bullet fly, then it will make sense to you the work of a rifle scope.
Normally, the bullet does not go following the straight path; rather, they fly in a curve line. Therefore, you need to point the barrel a bit upwards for that you can take advantage of your rifle scope.
2. Bring a Stable Platform to Sight the Riflescope
Setting up your riflescope requires a number of the toolkit, including the gun vice, Torx wrenches, and small screwdriver, and then you can adjust your scope.
To deal with this equipment, you need to have a stable platform. Hence, one or more sandbags would be great, or if you’re ready to invest, then buy a commercial rifle rest that is far better than the sandbags.
While sighting the rifle, you will need even, level, and stable platforms to go through the whole process.
3. Boresighting
Now it is time to get on your rifle on the paper for that using the popular boresight strategy. It is a primary process, and it takes place when you are setting up it at a close range, like 25 to 45 yards targeting the large paper.
Afterward, choose a good rest position to make sure you are spreading out. Again, try to keep the same type of ammo, which you are not only using the scope but also using in the field too. With all of your necessary tools, start adjusting them.
Now guess what happened with the bolt action or the single shotguns are being boresighted? The process would be hackneyed; thus, you may need to look through the barrel than semi-automatics.
Furthermore, the lever action and pumping of the rifle can be sighted with the help of a simple device named laser bore sighter.
Now you may find the bore sighter inserted in the muzzle. On the other hand, you can find this right at the chamber of your rifle, and it helps to line up the barrel.
It is the most important stuff to get the right boresighter that’s come perfect with the weapon that you are using.
4. Getting on the Paper
So you are done with the bore sighting your rifle, and now you are looking to start shooting.
Well, make a pause there because there are a lot of things that still need to do. When you are preparing for hunting, ensure that you get the same kind of ammunition that you usually use while hunting.
Because while you are dealing with different types of ammunition, the alien one would have some other types of impact that you are not accustomed to.
The shooting yard should be 25 yards, and when you fine-tune the range, then only if, go for the longer ranges. This will help you to save your time and inspire you, whereas the longer range will frustrate you like 50 to 100 yards.
So, when you are under 25 yards, you can get on the paper and try the targeting at that range.
Experts profoundly concentrate on the sighting for that they prefer a stable position with support. We have already mentioned to you to use a sandbag that is come of the best quality.
By the way, you should avoid the support from your muscles because it will lower the accuracy to a great extent.
5. Move the Crosshair
Why do you need to move the crosshair at this stage? One of the most important tasks is to ensure that the scope is on the right line, along with the target. For that, you can come to further adjustments until it sets correctly.
Normally, you need to place the crosshair at the top dead center. Afterward, you need to zero the rifle at a short distance so that you can align the barrel within 25 yards.
However, you can try it up to a hundred yards and so.
6. Ensure Mobility of the Erector Tube
The target requires to be set properly, no doubt of that, but how you are going to fix it whenever the lenses are not set properly?
For that, the rings need to be in the right place and tighten perfectly; as a result, it will ensure the mobility of the erector tube right inside of the scope.
The proper tightening process helps a lot, especially avoiding the jumping and erratic movements while the rifle will recoil. On the flip side, avoid the extreme tightening process as it may crush the old erector spring.
7. Fine-Tuning Before the Test
We have already described shortly about this segment to getting on the paper segment. However, at that stage, we suggest you don’t increase the trial by more than 25 yards.
Now it is high time to set your rifle scope maximizing as much as you can up to 200 yards.
To shoot that big yards of distance, we will recommend you to go with the bull’s eye process, which will measure the distance from the center of your group. Depending on that, you can easily set up the scope if necessary.
For that, you need to remember the four clicks are equal to 100 yards, not less than that. And, when you will decide to sight the rifle with 200 yards of the distance, then make sure 2 clicks (1/4 MOA scope).
Again, you need to make sure the zeroing at 100 yards. In this stage, there is a debate among the experts whether setting up the rifle would be with the elevation or windage.
Hunting in the short range up to 100 yards and the adjusting process allowing different types of bullets may not give you a hard time.
However, when you try this out at 200 yards, then different rifles and cartridges will behave differently, however, in 100 yards, you may not find the same thing, that’s why we suggest you go up to 100 yards at the beginning.
8. Test Some Shots
Whatever you have done, you need to check out whether the adjustment is close enough to hit the target or not.
To test this, you can aim at a target that is not far from 100 yards. It is important to make sure the capabilities of the live firing of your rifle, and this course of action will depend on the three-round sets.
To remove human error, you will need to sit in a stable and comfortable position. Now start the first shots and then rest for a while and then the second and the final shots.
Now make sure you set the scope at the highest magnification in order to deliver sharp images.
9. Doing the Final Adjustments
Here are the following instructions for the final adjustments:
#1. First off, you need to see what type of knowledge you have. Normally, you may find your scopes with the 2 dials. The first one would be at the top, and the second one would be at the side that helps to adjust your scope and make it zero.
While you will be going through these adjustments, you will be aware of the position of your rifle’s aim is on the line or not. So, here you come to know that the top knobs used to set up the ups and downs of the crosshairs.
At that time, the other one would be adjusting from left to right. By the way, the older scopes do have some small keys that are used for turning the knobs for good precision.
#2. When you are practicing your target, you can move the sight of your scope where it misses. So, move it to the right direction of the missing point and constantly make the same adjustment again and again in order to get the perfect adjustment.
#3. Are you still struggling while hitting the target more precisely? Then go for the small adjustment to bring a little but effective change.
Besides, you can read the whole user manual, and then you probably come to know what inches per click may get you and afterward turn the dial correctly.
#4. The last tip to you is to let you know that you can use a laser sighter for getting the ultimate precision.
If you don’t have it, then take it to the gun shop where you can manually place it. Once you get it, then make sure it is fitted properly and then test it.
Precautions and Safety Tips for Adjusting a Rifle Scope
 You need to make sure the precautions while adjusting a Rifle Scope and which way to turn to adjust perfectly.
Adjusting the Parallax:
- Getting a crispy and clear reticle is a must especially when you sight down the scope.
- You need to adjust the parallax turret to some extent along with your head and eye movement during aiming.
- Sort out more movement in the reticle and make sure the further adjust it to the parallax to the reticle.
Adjusting the Elevation:
- Keep enough bullets with you as you will need to fire a lot of them to correct the settings.
- Don’t use different bullets brand.
- Don’t adjust windage and elevation simultaneously.
- Keep calm.
- Cool down your rifle at the intervals of taking shots.
- Make 3 shots per click on the scope.
Conclusion
We recommend you to use modern rifles and scopes as it saves your time and effort. You may not need to fix on some common or regular scope so you can use different types of scope to allow more flexibility while making the right adjustment.
Most importantly, ensure that the erector tube is not tightened too much. Finally, enjoy the setting up process, as we mentioned in our article on how to adjust a rifle scope.